Understanding the MDM integration
This topic uses the DM Query, MDM Explorer, and Short Drinks samples that come with the UNICOM Intelligence Developer Documentation Library to demonstrate some of the MDM integration features explained in
MDM integration.
▪DM Query: A query tool that you can use to help you understand how the CDM works. DM Query enables you to use the UNICOM Intelligence Data Model to connect to case data, see the virtual table schema that has been used, and run SQL queries.
▪MDM Explorer: A sample application that you can use to help you understand the objects in an MDM Document.
▪The Short Drinks sample: This consists of an .
mdd file (
short_drinks.mdd) that has six versions and a SQL Server backup of a relational MR (RDB) database. The database contains UNICOM Intelligence Interviewer response data that was collected in five "waves" using the five versions of the metadata. Before you can run the examples in this topic, you need to restore the backup. To do this you need to have SQL Server Client Tools installed. For more information, see
Restoring the Short Drinks sample database.
This topic assume that the Short Drinks sample has not been changed significantly since you installed it. Take a backup copy of the .mdd file before making changes to it so that you can restore the original version afterwards.
Versioning
In this section, you will connect to the Short Drinks case data in four ways. First using the latest version of the metadata, second using an earlier version of the metadata in which different variables were present, third using all versions of the metadata, and finally using no metadata. When you connect using the metadata, the column names in the VDATA virtual table match the names of the variable instances in the selected version or versions of the metadata. When you connect without metadata, the VDATA virtual table contains columns for all of the variables regardless of which version they were created in.
1 In Windows Explorer, go to the folder in which the Visual Basic 6 version of DM Query was installed. By default, this is:
[INSTALL_FOLDER]\IBM\SPSS\DataCollection\7\DDL\Code\Tools\VB6\DM Query
2 Double-click the DM Query.exe file.
This opens the DM Query window.
Now connect to the Short Drinks database using the latest version of the MDM Document.
3 From the DM Query File menu, choose New Connection.
This opens the Connection tab in the Data Link Properties dialog box.
4 From the Metadata Type list, select Intelligence Metadata Document.
5 Enter the Metadata Location: Click Browse, navigate to the folder in which the Short Drinks sample .mdd file was installed, and then select it. By default, it is installed in:
[INSTALL_FOLDER]\IBM\SPSS\DataCollection\7\DDL\Data\Mdd
6 From the Case Data Type list, select Intelligence Database (MS SQL Server) (read-write).
7 In
Case Data Location, type the OLE DB connection string. Typically the default OLE DB connection string stored in the .
mdd file is displayed, but you might need to change the server name to reflect the name of the server on which you restored the database. For more information, see
Connecting to a relational MR database using RDB DSC 2.
8 Enter short_drinks in the Case Data Project text box, and then click OK.
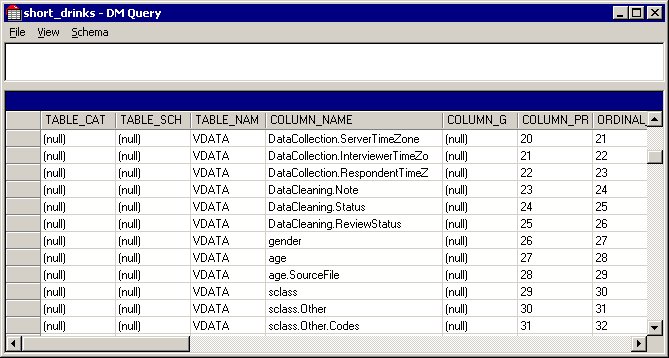
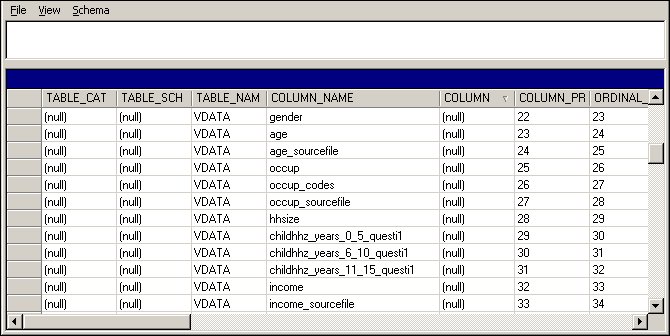
9 Look at the schema: choose Columns from the Schema menu in DM Query.
The COLUMN_NAME column shows the names of the columns in the virtual table schema. Scroll through the column names. The system variables are listed first.
Further down, there is a column called occup, which is a variable that was added in version 5. The sclass variable was deleted in version 5 when the occup was added.
The sclass variable is not present. This is because when you selected the .mdd file in the Data Link Properties dialog box, you did not specify which version to use, so the most recent version was automatically used.
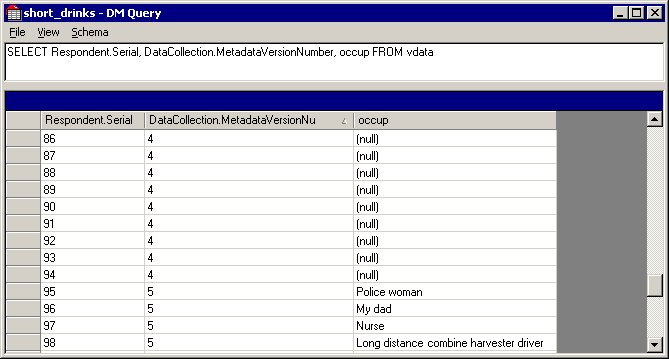
10 Run a query to see the data that is stored in the occup and Respondent.Serial and DataCollection.MetadataVersionNumber columns: Type the following in the text box:
SELECT Respondent.Serial, DataCollection.MetadataVersionNumber, occup FROM vdata
Respondent.Serial and DataCollection.MetadataVersionNumber are system variables that store the respondent's serial number and the metadata version that was used to collect the responses, respectively. Scroll through the results: the occup column has a NULL value for all of the respondents for whom the metadata version is less than 5. This is because the occup variable didn't exist in the metadata before version 5.
To open the Short Drinks sample .mdd file in MDM Explorer
Before connectiong to the case data again using an earlier version of the metadata, open the .mdd file in MDM Explorer.
1 In Windows Explorer, browse to the folder where MDM Explorer was installed. (Typically this is [INSTALL_FOLDER]\IBM\SPSS\DataCollection\7\DDL\Code\Tools\VB6\MDM Explorer.)
2 Double-click MDM Explorer.exe.
This opens the MDM Explorer window.
3 From the File menu in MDM Explorer, choose Open Document.
4 In the Open Metadata File dialog box, browse to the folder where the Short Drinks sample .mdd file was installed.
5 Select short_drinks.mdd and select Open as read-only before clicking OK.
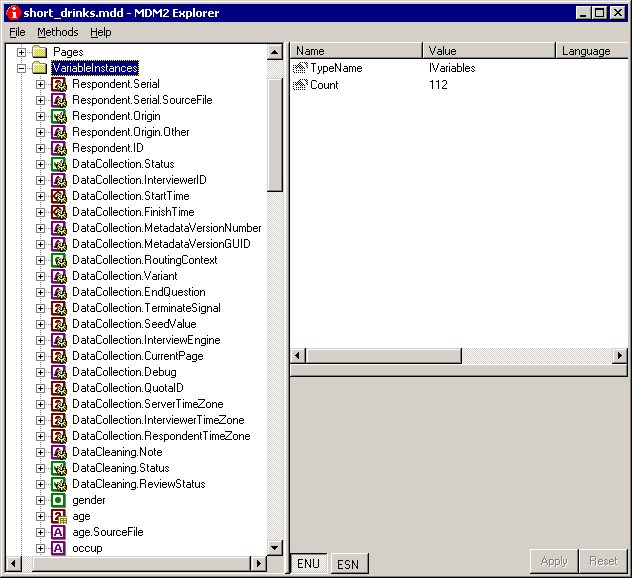
The VariableInstances folder in the left pane of the MDM Explorer window corresponds to the Document.Variables colllection. If you open the folder, you will see that the names of the variable instances that appear beneath it exactly match the column names in the schema shown in DM Query. This is because when you connect to the case data using an MDM Document, the variable instances in the Document.Variables collection define the columns in the VDATA virtual table and by default, MDM Explorer displays the details of the most recent version of the MDM Document.
6 Connect to the Short Drinks database using version 2 of the MDM Document:
From the DM Query File menu, choose New Connection. Repeat the steps you used before, but this time click the Properties button in the Metadata section. This opens the Metadata Properties dialog box. Select 2 in the Version list box and then click OK.
7 Choose Columns from the Schema menu to look at the schema.
This time, the schema includes the sclass variable but not the occup variable. This is because now version 2 of the metadata is defining the schema and the occup variable did not exist in version 2 but the sclass variable did.
8 Connect to the Short Drinks database using all versions of the metadata: From the DM Query File menu, choose New Connection.
9 Repeat the steps you used before, clicking the Properties button in the Metadata section again. But this time, select All Versions in the Version list box, before clicking OK.
10 Choose Columns from the Schema menu to look at the schema.
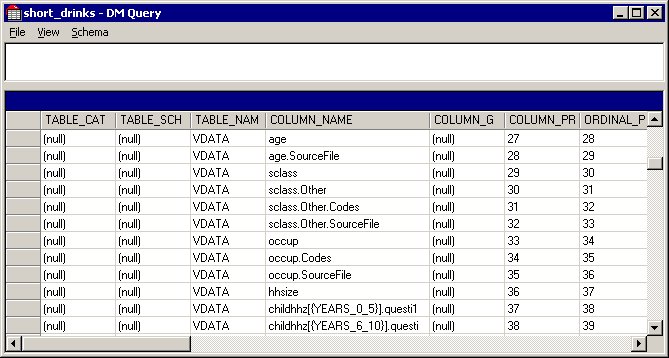
Now you are using all of the versions of the metadata, the schema includes both the
occup and
sclass variables. When you select multiple versions of the metadata, they are combined to form a superset (sometimes known as a
superversion). When there is a conflict between, for example, a question text in two or more versions, the most recent version generally takes precedence. For more information, see
Data Link Properties: Metadata Properties.
11 Connect to the Short Drinks database using all versions of the metadata:
From the DM Query File menu, choose New Connection. Repeat the steps you used before, but this time select None in the Metadata Type list.
12 Choose Columns from the Schema menu to look at the schema.
The schema again includes both the occup and sclass variables, but this time the variables are in a different order. This is because when you connect without metadata the schema is taken directly from the case data.
Variable names
In this section, you connect to a IBM SPSS Statistics.sav file that was created by exporting data from the Short Drinks RDB database. First you connect to the .sav file using the .mdd file that was used to export the data, and then you connect to the .sav file without using an MDM Document.
When you connect using the .mdd file, the VDATA column names are the same as the names of the variable instances in the MDM Document, as in the previous section. However, when you connect without an MDM Document, the VDATA column names match the short variable names used in the .sav file.
You can export the Short Drinks case data to a IBM SPSS Statistics.sav file.
1 Connect to the .sav file using the MDM Document: From the DM Query File menu, choose New Connection.
2 From the Metadata Type list, select Intelligence Metadata Document.
This opens the Connection tab in the Data Link Properties dialog box.
3 Enter the Metadata Location: click Browse, and then navigate to the folder that the .mdd file is in. If you are using the output of a DMS file, this must be the output .mdd file.
4 From the Case Data Type list, select IBM SPSS Statistics SAV File (read-write).
5 In Case Data Location, type the name and location of the .sav file.
6 Leave the Case Data Project box blank.
7 Click OK.
8 Choose Columns from the Schema menu to look at the schema.
If you used the mrInterviewFirstBatchToSav.dms sample DMS file, the column names are the same as in the first example above. You can run the same query that you ran above with similar results.
SELECT Respondent.Serial, DataCollection.MetadataVersionNumber, occup FROM vdata
Even though you are now accessing case data in a completely different format, using the UNICOM Intelligence Data Model means that you can use the same query. This is one of the advantages of the UNICOM Intelligence Data Model: you can access data of different types in a standard way.
Now connect to the .sav file without using an MDM Document.
9 From the DM Query File menu, choose New Connection.
10 Repeat the steps you used to connect to the .sav file before, but this time select None in the Metadata Type list.
11 Choose Columns from the Schema menu to look at the schema.
Now that you have connected without an MDM Document the column names are different from the names of the MDM variable instances. The column names now match the short variable names used in the .sav file.
When you connect to a .
sav file, you can also connect using the metadata through the as an MDSC. This is what you would usually do when you connect to a .
sav file that does not come from a UNICOM Intelligence Data Model export. For more information about the mapping between the MDM and the .
sav file used by , see
SPSS Statistics SAV DSC.
Synchronization
This section demonstrates how the Provider attempts to keep the CDM and MDM synchronized. However, the Provider can do this only when you open the metadata in read-write mode and the most recent version of the metadata is unlocked. In the Short Drinks sample .mdd file that comes with the UNICOM Intelligence Developer Documentation Library, the most recent version of the metadata is locked. However, you can easily create a new unlocked version in MDM Explorer.
To create a new unlocked version of the metadata:
1 Open the Short Drinks .mdd file in MDM Explorer as before, but this time do not select Open as read-only.
2 Expand the Versions folder in the left pane of the MDM Explorer window.
3 If the last version in the list is called LATEST, it means that the most recent version is unlocked and you not need to create a new unlocked version.
4 If the last version in the list is called something else (such as 5), it means that the most recent version is locked and you need to create a new unlocked version. To do this, select the Versions folder, and then choose Add Version from the Methods menu. A new version called LATEST is added to the list of versions.
5 Close MDM Explorer, and if you created a new version make sure that you save the file.
6 Connect to the Short Drinks database using the latest version of the MDM Document: From the DM Query File menu, choose New Connection.
7 Repeat the steps you used in the first example in this topic, but this time make sure you select Open metadata read/write.
8 Type the following statement in the SQL box and press Return.
ALTER TABLE vdata ADD volume DOUBLE
This statement adds a numeric variable called volume to the VDATA virtual table. If you close DM Query, and then open the Short Drinks .mdd file in MDM Explorer, you can see the volume variable in the lists of fields and variable instances.
You may now want to repeat this procedure using the following SQL statement, which deletes the volume column from both the case data and the metadata.
ALTER TABLE vdata DROP volume
Derived variables
For examples of using dynamically derived variables, see
Derived variables.
See also