Using the UNICOM Intelligence Interviewer - Server Admin wizards
The UNICOM Intelligence Developer Documentation Library includes three Visual Studio .NET wizards for creating and enhancing UNICOM Intelligence Interviewer - Server Admin activities.
The application components created by the wizards make use of the UNICOM Intelligence Interviewer - Server Admin Application Framework: see
Using the UNICOM Intelligence Interviewer - Server Admin Application Framework. You may also want to use the Framework to enhance your application, depending on its complexity.
Wizards
UNICOM Intelligence Application (DataCollectionApp)
Creates a C# ASP.NET application that consists of multiple pages arranged in a frameset and allows for the use of the Menu and Tab controls that are common in UNICOM Intelligence Interviewer - Server Admin activities. The application includes a
Web.config file that enables forms authentication. The application also includes support for application session monitoring: see
Supporting application session monitoring.
Simple UNICOM Intelligence Application (SimpleDataCollectionApp)
Creates a C# ASP.NET application that consists of one simple page and an ApplicationInit page, which is required for the activity to be properly launched from UNICOM Intelligence Interviewer - Server Admin. The application includes a Web.config file that enables forms authentication.
UNICOM Intelligence Page
Adds a web page to an existing C# ASP.NET application.
Software requirements
To use the wizards, the following software must be installed on your computer:
▪UNICOM Intelligence Interviewer - Server Admin. This is installed when you install either UNICOM Intelligence Interviewer Server or UNICOM Intelligence Survey Tabulation.
▪UNICOM Intelligence Developer Documentation Library sample files. The sample files include the wizards. The wizard scripts are normally installed to:
Project templates:
C:\Documents and Settings\<Windows user name>\My Documents\Visual Studio 2010\Templates\ProjectTemplates
UNICOM Intelligence Interviewer - Server Admin page templates:
C:\Documents and Settings\<Windows user name>\My Documents\Visual Studio 2010\Templates\ItemTemplates
▪Microsoft Visual Studio 2010.
▪Visual Studio 2010 Web Deployment Projects - RTW. This can be downloaded from Visual Studio 2010 Web Deployment Projects:
▪Converting Visual Studio Web Sites and Projects to Visual Studio 2010. See:
http://msdn.microsoft.com/en-us/library/bb763180.aspx
Using the application wizards
1 From the File menu in Visual Studio, choose New > Project
2 In the list of Project types, click the Visual C# node.
3 In the list of Templates, click either DataCollectionApp or SimpleDataCollectionApp.
4 In the Location edit box, enter the location for your new application and click OK.
The wizard creates the application. To view the application components, choose Solution Explorer from the View menu to open the Solution Explorer window.
Using the page wizard
1 Open an existing C# ASP.NET project in Visual Studio, for example, a project that you created using one of the application wizards.
2 From the Project menu, choose Add New Item.
3 In the list of Templates, click UNICOM Intelligence Interviewer - Server Admin Page.
4 In the Name edit box, enter the file name for your new web page (which must have a .aspx extension) and click OK.
The wizard adds the web page to the application. To confirm this, choose Solution Explorer from the View menu to open the Solution Explorer window.
Updating existing applications
These instructions can be used to upgrade from version 5.6, and previous versions, to version 6 or above.
1 Search your project for logo.png (you commonly find it in collections.aspx) and remove the reference to the logo (it will be replaced by the new banner).
2 Copy IsaBanner.ascx from C:\InetPub\wwwroot\SPSSMR\\Shared and add it to your project. Additional sample files are located in C:\InetPub\wwwroot\SPSSMR\ Shared\SampleCode (Banner.aspx, Banner.aspx.cs, and Banner.aspx.designer.cs).
3 Create an UNICOM Intelligence Interviewer Page named Banner.aspx. Add the IsaBanner control to this page using the following code.
Add this code below the existing Page statements:
<%@ Register Src="IsaBanner.ascx" TagName="IsaBanner" TagPrefix="uc1" %>
Add this code in the head:
<link href="Shared/spssmrNet.css" type=text/css rel=stylesheet>
<link href="../shared/isabanner.css" type="text/css" rel="stylesheet" />
Add this code in the body:
<uc1:IsaBanner ID="IsaBanner1" runat="server" />
Apply the .css to the body:
<body class="banner_body">
4 Move the code that creates the menu from menu.aspx.cs into Banner.aspx.cs, and set the menu property MenuPlacement to Placement.Right.
5 Move the JavaScript code related to the menu item from menu.aspx into Banner.aspx.
<!-- Menu stylesheet and javascript files -->
<link href="Shared/coolmenu/spssmenu.css" type=text/css rel=stylesheet>
<script type="text/javascript" src="Shared/coolmenu/coolmenus4.js"></script>
Also move any special setup for the Menu.
Note The form element ID should be Menu: <form id="Menu" runat="server"> This may also require a change in Banner.aspx.designer.cs. There is no need to update the form element ID in menu.aspx as form element ID can duplicate the Banner.aspx form element ID.
6 Edit the .aspx.cs that sets up the ApplicationUtils collection (this might be MainFrame.aspx.cs or Default.aspx.cs).
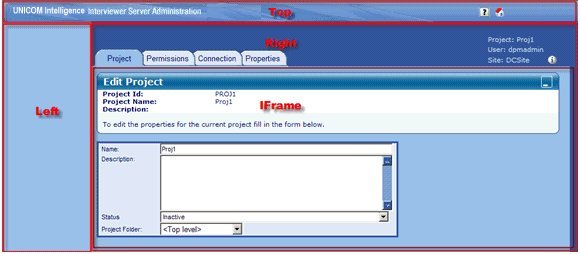
The following image illustrates the default frameset:
The Top frame holds banner.aspx, which displays the logo and menu.
The Left frame holds Collections.aspx.
The Right frame holds menu.aspx, which creates an IFrame and loads Main.aspx.
7 Update the ApplicationUtils initialization to match the frameset as follows:
ApplicationUtils["tab"] = "menu.aspx";
ApplicationUtils["main"] = "main.aspx";
ApplicationUtils["collections"] = "Collections.aspx";
8 Locate the current call to ApplicationUtils.CreateFrameset or ApplicationUtils.WriteFramesetResponse and move it to below the initialization of the ApplicationUtils array.
string frameset = ApplicationUtils.CreateTLRFrameset(100, false, 0, "AppUtility");
System.Web.HttpContext.Current.Response.Write(frameset);
9 If the original project uses WriteFramesetResponse() to create the frameset, replace WriteFramesetResponse() with CreateTLRFrameset and explicitly call Response.Write() to write the CreateTLRFrameset return value in the response.
See also

