3. Transferring different types of data
Generally DMS files use the UNICOM Intelligence Data Model and its data source components (DSCs), to read and write data in different formats. DMS files can also transfer data using OLE DB providers that are not part of the UNICOM Intelligence Data Model. However, this topic provides an introduction to transferring different types of data using the UNICOM Intelligence Data Model and its DSCs.
▪For an introduction to DSCs and information about the DSCs that are supplied with the UNICOM Intelligence Data Model, see
Available DSCs.
You can use a DMS file to transfer data from any format for which you have a suitable read-enabled DSC to any format for which have a suitable write-enabled DSC.
This section shows how to set up a DMS file to transfer the Museum sample Quanvert database to a UNICOM Intelligence Data File (.ddf). This transfer uses the
Quanvert DSC to read the Quanvert database and the
UNICOM Intelligence Data File CDSC to write the UNICOM Intelligence Data File.
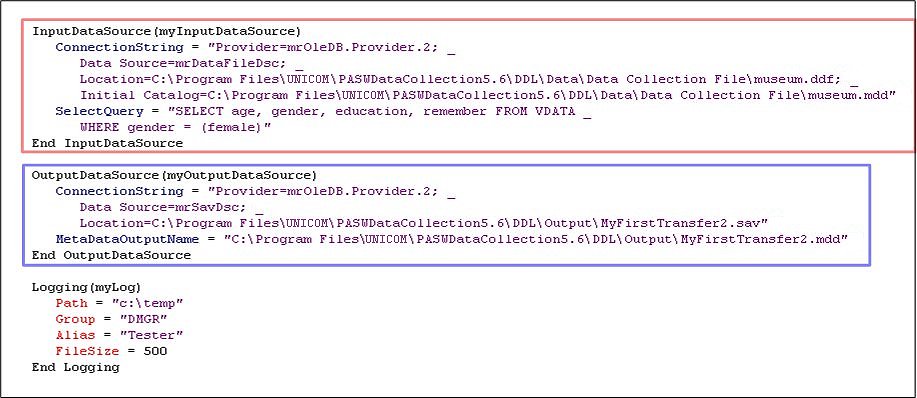
First, look at
MyFirstTransfer2.dms file in UNICOM Intelligence Professional again. This section assumes that you have created the
MyFirstTransfer2.dms file as described in
2. Setting up a filter. If you have not done that, create the file now, so it looks like this:
The InputDataSource section (highlighted in red) is where you define the details that relate to the data you want to transfer. See also
InputDataSource section.
The OutputDataSource section (highlighted in blue) is where you define the details that relate to the target data. See also
OutputDataSource section.
It is the
ConnectionString parameter in each of these sections that defines the name and location of the data and the DSC and other options that you want to use. You can type in the connection string, but you must be careful to spell all of the connection properties and file and path names correctly. For more information, see
Connection properties.
However, there is an easier way of setting up the connection string, and that is to use the UNICOM Intelligence Professional Connection String Builder. Let's do that now for the InputDataSource section:
Using the UNICOM Intelligence Professional Connection String Builder
1 In the InputDataSource section, delete the value of the connection string (shown below):
ConnectionString = "Provider=mrOleDB.Provider.2; _
Data Source=mrDataFileDsc;
Location=C:\Program Files\UNICOM\Intelligence\<version>
\DDL\Data\Data Collection File\museum.ddf;
Initial Catalog=C:\Program Files\UNICOM\Intelligence\
<version>\DDL\Data\Data Collection File\museum.mdd"
Your connection string should now look like this:
ConnectionString = ""
2 Keeping the cursor between the quotation marks, choose Connection String Builder from the Tools menu.
This opens the Connection Tab in the Data Link Properties (see
Data Link Properties: Connection), with the Provider tab already set up to use the UNICOM Intelligence OLE DB Provider.
3 From the Metadata Type list, select Quanvert Database.
4 Enter the Metadata Location of the Museum sample Quanvert database. You can either type the name and location of the Quanvert qvinfo file into the box or click Browse and select the file in the Open dialog box. By default the Museum sample Quanvert database is in this folder:
[INSTALL_FOLDER]\IBM\SPSS\DataCollection\7\DDL\ Data\Quanvert\Museum
5 From the Case Data Type list, select Quanvert Database.
6 Enter the Case Data Location of the Museum sample Quanvert database exactly as you entered it in the Metadata Location text box.
7 Click OK.
This inserts the connection string at the cursor position. Now your InputDataSource section should look like this:
InputDataSource("My input data source")
ConnectionString = "Provider=mrOleDB.Provider.2;
Data Source=mrQvDsc;
Location=C:\Program Files\UNICOM\Intelligence\<version>\
DDL\Data\Quanvert\Museum\qvinfo;
Initial Catalog=C:\Program Files\UNICOM\Inteligence\
<version>\DDL\Data\Quanvert\Museum\qvinfo;
MR Init MDSC=mrQvDsc"
SelectQuery = "SELECT age, gender, education, remember
FROM VDATA _ WHERE gender = {female}"
End InputDataSource
To make the connection string easier to read, we have added line continuation characters so that we can place each property on a separate line, like the original connection string in
MyFirstTransfer.dms. For more information, see
Breaking up long lines in the DMS file. However, if you prefer you can leave the connection string on one very long line.
Some of the connection properties were not present in the original connection string that you deleted. This is because you do not need to specify connection properties whose default values are being used.
Setting up the connection string
Now set up the connection string for the OutputDataSource section for the export to the UNICOM Intelligence Data File:
1 Delete the connection string in the OutputDataSource section.
2 Without moving the cursor, choose Connection String Builder from the Tools menu.
Again, this opens the Connection Tab in the Data Link Properties (see
Data Link Properties: Connection), with the Provider tab already set up to use the UNICOM Intelligence OLE DB Provider.
3 From the Metadata Type list, select (none).
4 From the Case Data Type list, select UNICOM Intelligence Data File (read-write).
5 Enter the Case Data Location for the new UNICOM Intelligence Data File. You can either type the name and location of the file into the text box or click Browse and browse to the location in the Open dialog box.
6 Select the Advanced tab.
7 Select Allow dirty data. This specifies that we want the case data to be validated, but we want to accept data even if it contains some errors and anomalies.
8 Click OK.
This inserts the connection string at the cursor position.
9 Edit the MetadataOutputName parameter in the OutputDataSource section, to give the output metadata file a different name (such as MyFirstTransfer3.mdd) so that when we run the file, the new metadata will not overwrite the metadata that was created for the .sav file in the previous section.
10 Save the file with a new name, such as MyFirstTransfer3.dms.
11 Run MyFirstTransfer3.dms.
You can use similar techniques to set up connection strings for different types of transfer. For more information, see
Transferring data using a DMS file.
Next
See also