Installing Server > Installing UNICOM Intelligence Interviewer - Server > Installing UNICOM Intelligence Interviewer - Server > Cluster installation
 
Cluster installation
When you install on more than one computer, you typically follow these steps:
1 Log in to the server that will host the Accessories Service, and then create a site preparation file. See Creating the site preparation file and folder.
This file names the computers on which the various services will be installed, and sets up a central site preparation folder that can be used by other computers in the cluster. The installation procedure installs not only the services you choose for the computer you have logged in to, but also the project management components. This computer becomes the Primary DPM server.
2 On each of the computers named in the site preparation file, run the installation program from the site preparation folder. Always install onto your Accessories servers first, followed by all Interviewing servers, and finally all Web servers.
See Installing the UNICOM Intelligence Interviewer - Server services on each computer in the site preparation file
What's installed where?
Software
Web servers
Interviewing servers
Accessories servers
Database servers
Scriptwriters' computers
UNICOM Intelligence Data Model
No
Yes
Yes
No
Yes
DPM
No
Yes
Yes
No
Yes (partial)
UNICOM Intelligence Interviewer - Server Admin and activities
No
No
Yes
No
No
Activate client component
No
No
Yes
No
Yes
Activate server component
No
Yes
Yes
No
No
Quota
No
Yes
Yes
No
Yes
Interviewing components
No
Yes
No
No
No
Web components
Yes
No
No
No
No
Image cache
Yes
No
Yes
No
No
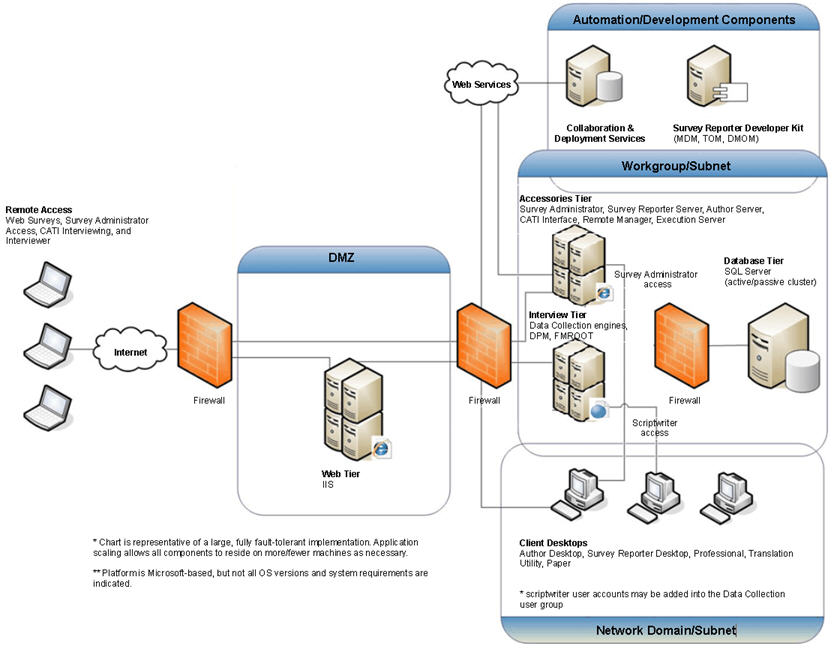
UNICOM Intelligence cluster environment
The following diagram illustrates a typical UNICOM Intelligence cluster environment.
Notes
The installation program will call the web service when a new server is added to an existing cluster environment by the manual update of the site installation DataCollectionSitePrep.ini file (instead of modifying the primary server). Because the web service’s ClusterManagement uses Integrated Windows Authentication for user authentication, you must ensure that the web service URL can be accessed by the new server’s Windows account. An example web service URL is:
http://<AccessoryServerName>/SPSSMR/ClusterManagement/Servers
For more information on enabling Integrated Windows Authentication, see Configuration for enabling SPNEGO on the client.
See
Creating the site preparation file and folder
Installing the UNICOM Intelligence Interviewer - Server services on each computer in the site preparation file
Single sign-on in a cluster environment
Virtual directory, session engine, and Web service registration
DPM properties
Installing UNICOM Intelligence Interviewer - Server