User authentication in the Web API
Almost all requests to the Web API require the client to send an authentication credential.
▪A client application that is
non-interactive (for example, a tool that retrieves data and generates a daily report) can use either an API key (see
Getting started with the Web API) or the OpenID Connect “client credentials” authentication flow.
▪A client application that is user‑oriented (for example, a graphical tool for editing quota targets) must get an access token by using the OpenID Connect “authorization code” flow.
Using an OpenID Connect access token
The UNICOM Intelligence OpenID Connect provider is at https://<hostname>/SPSSMR/Oidc.
Changing the DPM properties
You must change the following DPM properties. (They are installed with values that use the internal hostname of the server, but this hostname is usually not the hostname that external clients use to access the server.)
After changing any of these properties, restart either the UIAPIService app pool, or the entire IIS service.
\Site\Properties\WebApi\Authentication\Oidc\Authority
Specify the public URL of the Oidc application, for example:
https://<hostname>/SPSSMR/Oidc
The Web API validates any access token that it received by contacting the “introspection” endpoint at that URL. The URL used for the “Authority” must be the same as the base URL that was used to request the access token.
\Site\Properties\Oidc\PublicUrl
Specify the public URL of the Oidc application (that is, the same value as \Site\Properties\WebApi\Authentication\Oidc\Authority), for example:
https://<hostname>/SPSSMR/Oidc
The Oidc application might redirect the browser to other URLs. The PublicUrl property tells the Oidc application how to redirect the browser back to itself again.
\Site\Properties\Oidc\Providers\WsFed\IntelligenceWsFed
Specify the public URL of the “metadata” endpoint of the WsFed application, for example:
https://<hostname>/SPSSMR/WsFed/Metadata
The Oidc application contacts this endpoint to get information about the WS-Federation service. The response contains the URL for the service, but it is based on the hostname that was used to access the Metadata endpoint. The Oidc provider redirects the user’s browser to the URL that the Metadata endpoint provided; therefore, that Metadata URL must be the public URL for the service.
Checking the OpenID Connect Provider configuration
1 In a web browser, go to https://<hostname>/SPSSMR/WebApi/SwaggerUI, and then click Authorize.
The Available Authorizations dialog box opens. It shows “openIdConnect (OAuth2, authorizationCode)”.
2 Click Authorize.
The ISA login dialog box opens. If Windows Authentication is possible, you might be automatically logged in as the current user.
3 Log in using a DPM Admin account.
The Available Authorizations dialog reappears.
4 Click Close.
5 Go to a set of endpoints, for example, DPM.Projects, and then expand the /Projects endpoint.
6 Click Try it out, and then click Execute.
The Responses > Server Response > Response body section displays a list of the projects that are on the server.
Using OpenID Connect authentication
When you use OpenID Connect authentication, users enter their username and password in the Interview Server Administration login dialog instead of the application. Oidc gives the user an authorization code which is sent back to the application. The application exchanges the authorization code for an access token. The access token allows the application to access the Web API on behalf of the user; the application never knows the user’s username and password.
When you use the SwaggerUI “Try it out” feature (see
Trying out requests), you can use an application such as Fiddler to inspect the HTTP requests between the browser and the Web API, for example, the headers that the browser sends to the /Projects endpoint. One of these headers is “Authorization”, which contains “Bearer” and the access token that was obtained from the OpenID Connect provider.
Configuring applications to get access tokens for the Web API
For an application to get an access token to access the Web API, you must configure the client in DPM. A client for SwaggerUI is configured in DPM when you install UNICOM Intelligence, under \Site\Properties\Oidc\Clients\SwaggerUI. (See also
Using the Swagger UI with the Web API.)
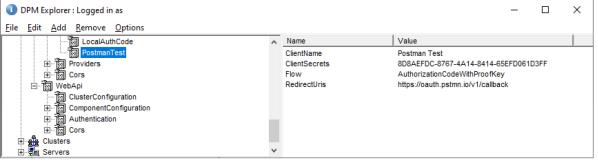
To create a client for other applications (for example, Postman), complete the following steps:
1 In DPM Explorer, go to \Site\Properties\Oidc\Clients.
2 Add a new properties collection, for example, “PostmanTest”. This name is the “client id” which will be used later.
3 Add the following properties to the properties collection:
|
Property
|
Value
|
|
ClientName
|
A name for the client, for example, “Postman Test”. This name is displayed if the user is required to consent to the client having access to the Web API.
|
|
ClientSecrets
|
A value that is difficult to guess, for example, a GUID.
|
|
Flow
|
For this example, use AuthorizationCodeWithProofKey.
|
|
RedirectUris
|
For Postman, use the following URL:
https://oauth.pstmn.io/v1/callback
|
4 In Postman, create a collection that is called “Intelligence Web API”.
5 Click the Authorization tab for the collection, and then set Type to OAuth 2.0.
6 Select Edit token configuration, and then enter the following values:
Property | Value |
|---|
Token Name | IntelligenceWebApi |
Grant Type | Authorization Code (With PKCE) |
Callback URL | Select Authorize using browser. |
Auth URL | The public URL of the Oidc application, followed by /connect/authorize |
Token URL | The public URL of the Oidc application, followed by /connect/token |
Client ID | PostmanTest (as configured in DPM) |
Client Secret | The ClientSecrets value that you specified in DPM |
Code Challenge Method | SHA-256 |
Code Verifier | blank |
Scope | openid intelligence_web_api |
State | blank |
Client Authorization | Select Send as Basic Auth Header. |
7 Click Get New Access Token.
The Interview Server Administration login page opens in a web browser.
8 Enter the login credentials of a DPM Admin user.
Postman shows “Authentication complete”, and an access token and an id token:
▪The access token is an opaque value that is to be sent to the Web API.
▪The id token is a JSON Web Token (JWT) that contains the user identity which the client application can use.
9 Click Use Token.
10 Add a request to the Postman collection: click the collection name, and then click Add request.
11 Configure the request as a GET request to https://<hostname>/SPSSMR/WebApi/Projects.
12 Ensure the Authorization tab is configured as “Type: Inherit auth from parent”, and then click Send.
The lower pane shows the available projects and their details.
See