Using the UNICOM Intelligence Interviewer - Server Admin wizards
The UNICOM Intelligence Developer Documentation Library includes three Visual Studio .NET wizards for creating and enhancing UNICOM Intelligence Interviewer - Server Admin activities.
The application components created by the wizards make use of the UNICOM Intelligence Interviewer - Server Admin Application Framework: see
Using the UNICOM Intelligence Interviewer - Server Admin Application Framework. You might also want to use the Framework to enhance your application, depending on its complexity.
Wizards
UNICOM Intelligence Application (DataCollectionApp)
Creates a C# ASP.NET application that consists of multiple pages arranged in a frameset and allows for the use of the Menu and Tab controls that are common in UNICOM Intelligence Interviewer - Server Admin activities. The application includes a
Web.config file that enables forms authentication. The application also includes support for application session monitoring: see
Supporting application session monitoring.
Simple UNICOM Intelligence Application (SimpleDataCollectionApp)
Creates a C# ASP.NET application that consists of one simple page and an ApplicationInit page, which is required for the activity to be properly launched from UNICOM Intelligence Interviewer - Server Admin. The application includes a Web.config file that enables forms authentication.
UNICOM Intelligence Page
Adds a web page to an existing C# ASP.NET application.
Software requirements
To use the wizards, the following software must be installed on your computer:
▪UNICOM Intelligence Interviewer - Server Admin. This is installed when you install either UNICOM Intelligence Interviewer Server or UNICOM Intelligence Survey Tabulation.
▪UNICOM Intelligence Developer Documentation Library sample files. The sample files include the wizards. The wizard scripts are normally installed to:
Project templates:
C:\Users\<user_name>\Documents\Visual Studio 2019\Templates\ProjectTemplates\Visual C#\
UNICOM Intelligence Interviewer - Server Admin page templates:
C:\Users\<user_name>\Documents\Visual Studio 2019\Templates\ItemTemplates\Visual C#\
▪Microsoft Visual Studio 2019.
Using the application wizards
1 In Visual Studio 2019, go to the Create a new project window.
2 Change the Language filter to “C#”, and then scroll down to the “SimpleDataCollectionApp” and “DataCollectionApp” wizards. Select one of the templates, and then create a new project.
3 In the new project, right‑click the project name in the tree, and then click Add > New Item.
The Add New Item window opens.
4 Click Visual C# in the tree, and then click DataCollectionPageCS to create a new page.
5 Click File > Save All.
6 In DPMExplorer, click Add Application from XML, and then add the *.xml file that is in the bin folder of the new project, for example:
C:\Users\<user_name>\source\repos\SimpleDataCollectionApp3\SimpleDataCollectionApp3\bin\SimpleDataCollectionApp3.xml
7 Click Build > Build your project.
8 In Mozilla Firefox, log into ISA. You will see your custom activity, and you can test in FireFox.
Using the page wizard
1 Open an existing C# ASP.NET project in Visual Studio, for example, a project that you created using one of the application wizards.
2 Click Project > Add New Item.
3 In the list of Templates, click UNICOM Intelligence Interviewer - Server Admin Page.
4 In the Name edit box, enter the file name for your web page (which must have a .aspx extension), and then click OK.
The wizard adds the web page to the application. To confirm this, click View > Solution Explorer to open the Solution Explorer window.
Updating existing applications
These instructions can be used to upgrade from version 5.6, and previous versions, to version 6 or later.
1 Search your project for logo.png (it is usually in collections.aspx), and then remove the reference to the logo; it will be replaced by the new banner.
2 Copy IsaBanner.ascx from C:\InetPub\wwwroot\SPSSMR\\Shared, and then add it to your project. Additional sample files are in C:\InetPub\wwwroot\SPSSMR\ Shared\SampleCode (Banner.aspx, Banner.aspx.cs, and Banner.aspx.designer.cs).
3 Create an UNICOM Intelligence Interviewer Page named Banner.aspx. Add the IsaBanner control to this page using the following code, below the existing Page statements:
<%@ Register Src="IsaBanner.ascx" TagName="IsaBanner" TagPrefix="uc1" %>
Add this code in the head:
<link href="Shared/spssmrNet.css" type=text/css rel=stylesheet>
<link href="../shared/isabanner.css" type="text/css" rel="stylesheet" />
Add this code in the body:
<uc1:IsaBanner ID="IsaBanner1" runat="server" />
Apply the .css to the body:
<body class="banner_body">
4 Move the code that creates the menu from menu.aspx.cs into Banner.aspx.cs, and set the menu property MenuPlacement to Placement.Right.
5 Move the JavaScript code related to the menu item from menu.aspx into Banner.aspx.
<!-- Menu stylesheet and javascript files -->
<link href="Shared/coolmenu/spssmenu.css" type=text/css rel=stylesheet>
<script type="text/javascript" src="Shared/coolmenu/coolmenus4.js"></script>
Also move any special setup for the Menu.
The form element ID must be Menu: <form id="Menu" runat="server">. This might also require a change in Banner.aspx.designer.cs. You do not no need to change the form element ID in menu.aspx, because form element ID can duplicate the Banner.aspx form element ID.
6 Edit the .aspx.cs that sets up the ApplicationUtils collection; this might be MainFrame.aspx.cs or Default.aspx.cs.
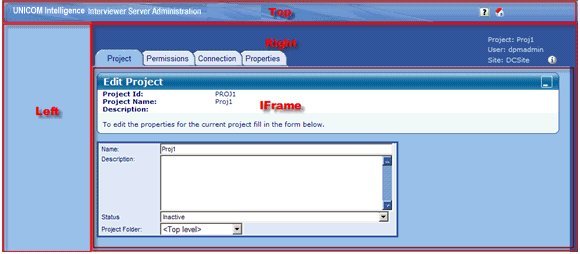
The following image illustrates the default frameset:
The Top frame holds banner.aspx, which displays the logo and menu.
The Left frame holds Collections.aspx.
The Right frame holds menu.aspx, which creates an IFrame, and then loads Main.aspx.
7 Update the ApplicationUtils initialization to match the frameset as follows:
ApplicationUtils["tab"] = "menu.aspx";
ApplicationUtils["main"] = "main.aspx";
ApplicationUtils["collections"] = "Collections.aspx";
8 Locate the current call to ApplicationUtils.CreateFrameset or ApplicationUtils.WriteFramesetResponse and move it to under the initialization of the ApplicationUtils array.
string frameset = ApplicationUtils.CreateTLRFrameset(100, false, 0, "AppUtility");
System.Web.HttpContext.Current.Response.Write(frameset);
9 If the original project uses WriteFramesetResponse() to create the frameset, replace WriteFramesetResponse() with CreateTLRFrameset and explicitly call Response.Write() to write the CreateTLRFrameset return value in the response.
See also

