Navigation buttons
The standard navigation bar has Next, Previous, and Stop buttons and is always displayed at the foot of the page after the last response line or other text. The interviewing program hides the Previous button on the first question. To display this navigation bar, place the following tag at the point you want the navigation bar displayed:
<mrNavBar> [Text] </mrNavBar>
where:
▪Text is any text of your choice. The interviewing program ignores this text, but it is useful if you want to test your template by opening the .htm file in your browser. In this case the text will be displayed in the position and with the attributes defined in the file.
If you would like more control over the navigation buttons, you can use the <mrNavButton> tag to specify which buttons you want to display and where, and the labels to use for each button. To display an individual navigation button, optionally with a label of your choice, place the following statement in the layout template:
<mrNavButton Name='name' [Text='label'] Enabled='filename' Disabled='filename'> [Text] </mrNavButton>
where
▪name is the button’s internal name and is one of Next, Prev, Stop, First, Last, or Goto.
▪label is the text to display on the button. The default is to display the button’s internal name.
▪filename is the name of the image file to display when the button is available (enabled) or unavailable (disabled) for use. Enabling or disabling a button in this way overrides the specification for the image in the interviewing program itself.
▪Text is any text of your choice. The interviewing program ignores this text, but it is useful if you want to test your template by opening the .htm file in your browser. In this case the text will be displayed in the position and with the attributes defined in the file.
If you are happy with the size and shape of the standard navigation buttons but would rather have different words displayed on them, just define the text you want to use when you display the button. There is no need to create new images for the buttons. For example:
<mrNavButton Name="Prev" Text="Back"/>
to display the standard Previous button but labelled Back instead of Previous.
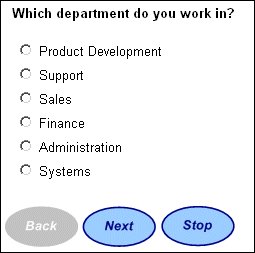
If you want to make more radical changes you can design your own navigation buttons. The following illustration shows a page with three customized navigation buttons, where the first one is disabled.
Page with Back button disabled
To generate a similar effect in your interviews place the following statements in your template:
<mrNavButton Name="Prev" Enabled="onprev.gif" Disabled="offprev.gif"/>
<mrNavButton Name="Next" Enabled="onnext.gif" Disabled="offnext.gif"/>
<mrNavButton Name="Stop" Enabled="onstop.gif" Disabled="offstop.gif"/>
An alternative to displaying a disabled image for navigation buttons that are unavailable is to remove the button from the Navigations collection. For example:
IOM.Navigations.Remove(NavigationTypes.nvNext)
Because the button has been removed from the collection, any buttons that come after it will be moved up so that there are no spaces in the navigation bar when it is displayed.
If you are familiar with HTML code, you can take more control over the navigation bar by using a <form>...</form> section to display the navigation bar at the side of the page. If used, the Form section must come within the Body section of the code.
Automatic focus on the Next button
When entering numeric or text responses, it is often an automatic reaction to press the Enter key to move to the next question. Unfortunately, because of the way that some browsers work on some computers, this takes you back to the previous question instead. This is typically a problem with Internet Explorer on Windows PCs, where pressing Enter instructs the browser to search for the first navigation button on the page, which is usually the Previous button. You can get around this problem in most cases by changing the way navigation buttons are specified in your templates, but note that this might not resolve the problem for all browsers.
The following code is provided “as-is”. If you use it, there is no guarantee that it will work in all browers, or will continue to work if the way in which browsers interpret HTML pages changes.
In your templates, replace the tags that display the navigation buttons with the following code. This code reflects the tags in the default layout template so you might need to amend it slightly if you use different tags in your templates.
<table id="Table1" cellspacing="1" cellpadding="1" width="300" border="0">
<tr>
<td></td>
<td valign="bottom" rowspan="2">
<mrNavButton Name="Next" Text="Forward" /> 
</td>
</tr>
<tr>
<td valign="bottom">
<mrNavButton Name="Prev" Text="Previous" /> 
</td>
</tr>
</table>
See also

