1. Running your first transfer
At the heart of data management scripting is the
Data Management Script (DMS) file. This is a text file with a .
dms filename extension that defines a data transformation job. At its simplest, a DMS file can define a simple transfer from one data format or location to another. The UNICOM Intelligence Developer Documentation Library comes with several sample DMS files, including
MyFirstTransfer.dms, which is similar to the example described in
Data Management Script (DMS) file. You can use this file to transfer to an IBM SPSS Statistics
.sav file the first 100 records in the Museum sample UNICOM Intelligence Data File that comes with the UNICOM Intelligence Developer Documentation Library.
The sample file is called MyFirstTransfer.dms, and by default it is in:
[INSTALL_FOLDER]\IBM\SPSS\DataCollection\7\DDL\Scripts\Data Management\DMS
To run a transfer
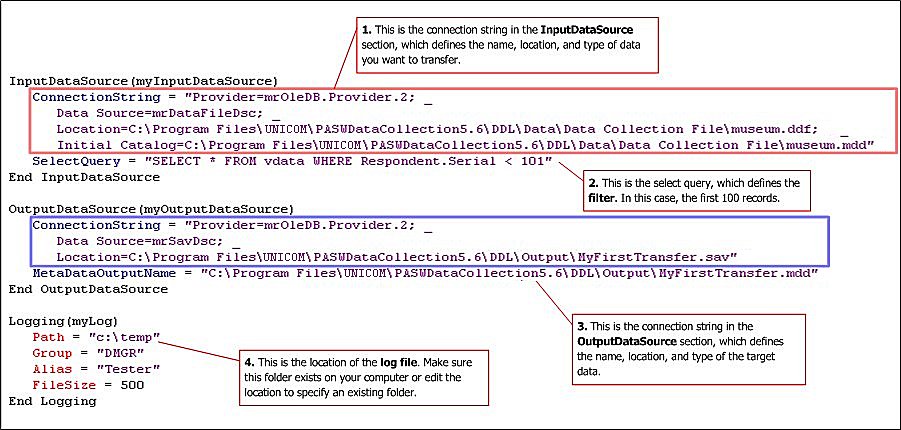
1 Open the file in UNICOM Intelligence Professional.
Before you run the file, check that it is set up correctly for your computer:
▪The connection string in the InputDataSource section (highlighted in red) defines the name, location, and type of the data you want to transfer. If the sample files have not been installed into the default location, you will need to edit the
Location and
Initial Catalog connection properties accordingly. See also
InputDataSource section.
▪The connection string in the OutputDataSection section (highlighted in blue) defines the name, location, and type of the target data. Check that the location exists on your computer and if not, edit the
Location connection property accordingly. (If a
.sav file exists with the same name in the specified location, move the existing
.sav file to a different folder before you run the transfer.) See also
OutputDataSource section.
▪The Path parameter in the Logging section defines the location for the log file. Check that this location exists on your computer, and if not, edit the parameter accordingly.
2 Click Debug > Start Without Debugging.
3 Click the Output tab (this is typically in the lower part of the UNICOM Intelligence Professional window) to bring the Output pane to the front.
If the sample files are present and in the specified locations, and there is not already a .sav file of the same name and in the same location as that specified in the OutputDataSource section, the transformation information displays in the Output pane.
“The transformation completed successfully” message means that the transfer has been successful.
Checking the output
Go to the target location folder in Windows Explorer; it contains these new files:
MyFirstTransfer.sav
This is an IBM SPSS Statistics.sav file that should contain the first 100 records from the Museum sample UNICOM Intelligence Data File. If you open this file in IBM SPSS Statistics, you will see that the variable names are different. This is because the long names that can be used in the UNICOM Intelligence Data Model are not valid in IBM SPSS Statistics and some of the variables (such as multiple response variables) are handled differently in IBM SPSS Statistics. The DMS file uses the UNICOM Intelligence Data Model data source components (DSCs) to read and write the data for the transfer. SPSS Statistics SAV DSC is used to write the data to the .sav file.
MyFirstTransfer.sav.ini
This file contains a setting that defines the language to be used when reading the .sav file that has just been created, for example, if the .sav file is used as the input data source in another data management script.
MyFirstTransfer.sav.xml
This file contains additional information for use by IBM SPSS WebApp. For more information, see “IBM SPSS WebApp XML File” in the UNICOM Intelligence Developer Documentation Library.
For more information, see
SPSS WebApp XML file.
MyFirstTransfer.mdd
This is a Metadata Document (.mdd) file for the transfer. If you want to use the .sav file in UNICOM Intelligence Reporter - Survey Tabulation, performance will be better if you access the .sav file using this file.
Next
The next topic shows how to set up a filter to restrict the variables that are included in the transfer. See
2. Setting up a filter.
See

