Subheadings in a shared list
The rules for defining subheadings inside a shared list are similar to those for placing subheadings in response lists. To add subheadings to a shared list, place the following statement in the metadata section of the questionnaire:
Syntax
name define
{
<subheading_1> ["<text_1>"]
{
<responses>
},
<subheading_2> ["<text_1>"]
{
<responses>
}
...
}
Parameters
<subheading_1> and <subheading_2>
The names of the subheadings.
<text_1> and <text_2>
The texts for the subheadings. If the texts are the same as the names and do not contain spaces or other non-alphanumeric characters, you can omit them and the interviewing program displays the subheading names instead.
<responses>
Either a list of response names and texts, or one or more use statements naming shared lists to be included in this list.
Example
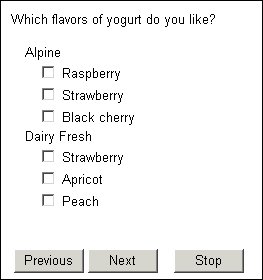
Like "Which flavors of yogurt do you like?" categorical [1..]
{
Alpine
{
use AlpineList namespace
},
DairyFresh "Dairy Fresh"
{
use DairyFreshList namespace
}
};
might produce the following list:
The responses in each section can be referenced as a group by using the subheading name.
For example, in the routing section, you can filter on one sublist by typing, say,
Responses.Alpine.Filter = {mango} to select mango flavored Alpine yogurt. However, subheadings do not make the response names unique so you cannot have two responses with identical names in the list. In this example, Alpine and Dairy Fresh each produce different flavors of yogurt. To generate this sort of display and have the same responses appearing under each subheading, see
When the same response appears in more than one list.
If you sort a shared list that contains subheadings, the subsections are reordered, but the responses in each subsection remain in their original places under the subheadings.
See also

