Create another subject area to connect entities to and from other entities.
Prerequisite
Before you create a second subject area diagram, you must already have created a first subject area diagram. This is covered in Lesson 1.1: Create a subject area diagram.
Draw the subject area diagram
To draw the subject area diagram:
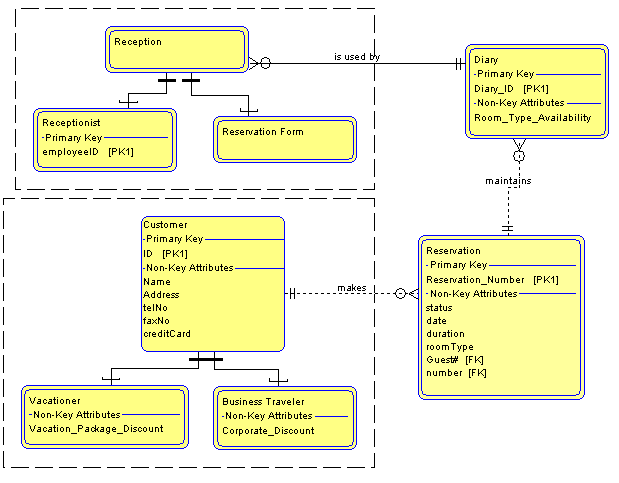
1 In the Tutorial encyclopedia, right-click the diagram workspace and select Choices. Drag it onto the diagram workspace the entities Receptionist, Reservation, and Customer. Close the Select and Drag dialog box.
2 Create new entities Reception, Reservation_Form, Diary, Business Traveler, and Vacationer, referring to the diagram below for placement of the entities.
3 Select the Super-sub Relation line, and draw a line fromCustomertoBusiness Traveler, and another line fromCustomertoVacationer.
Note As soon as you connect a super-sub relation line to the sub-entity, System Architect draws a dotted-line rectangular box around the entities. This line is a visual clue about the type of relationship. It expands automatically as sub-entities are added.
4 Select the Super-sub Relation line, and draw a line fromReceptiontoReceptionist, and another line fromReceptiontoReservation_Form.
5 Select the Non-Identifying Relation line, and draw a line fromCustomertoReservation. Name the line makes.
6 Select the Identifying Relation line, and draw a line fromReservationtoDiary. Name the line maintains.
7 Select the Identifying Relation line, and draw a line fromDiarytoReception. Name the line is used by.
8 Add the following attributes to the following entities (typing them into the attribute grid and pressing Enter after each one):
Entity
Add the Following Attributes
Diary
Diary_ID (and toggle on PK) RoomTypeAvailability
Reservation
Reservation_Number (and toggle on PK)
Business Traveler
Corporate_Discount
Vacationer
Vacation_Package_Discount
Receptionist
EmployeeID (and toggle on PK)
Note Foreign keys in a subject area diagram reflect the entity's position in the model diagram. You will notice that even though you have not propagated foreign keys for this subject model, the Reservation entity reflects the foreign keys from its relationship in the existing subject area model, Hotel Check-In
Your diagram should look like the one below:
Update foreign keys
1 Select Dictionary > Update FKs. System Architect will examine the data model, and propagate foreign keys in child entities based on the relationship types between entities.
2 Save the diagram by selecting File > Save Diagram.