Forms
You can use styles to lay out interview pages so that they replicate printed forms that you already use in your organization. While some basic familiarity with templates is handy, much of the skill in laying out forms lies in knowing how to use horizontal alignment to determine the relative positions of items on a line. This topic gives some examples that you can use as the basis for designing your own forms.
Displaying two or more questions on the same line
The output for this example is:
Title & last name on one line with first name & middle initials on the next line
It was created by defining the basic questions in the metadata section and placing the following code in the routing section:
' Template for question text & response controls on same line.
IOM.Questions[..].QuestionTemplate = "styles2.htm"
' Field width for question texts
Title.Label.Style.Width = "5em"
FirstName.Label.Style.Width = "5em"
Initials.Label.Style.Width = "6em"
LastName.Label.Style.Width = "5em"
' Response controls to right of question texts
Title.Style.ElementAlign = ElementAlignments.eaRight
FirstName.Style.ElementAlign = ElementAlignments.eaRight
Initials.Style.ElementAlign = ElementAlignments.eaRight
LastName.Style.ElementAlign = ElementAlignments.eaRight
' Put LastName/Initials on same line as previous element ...
Initials.Label.Style.ElementAlign = ElementAlignments.eaRight
LastName.Label.Style.ElementAlign = ElementAlignments.eaRight
' ... with this space between the two
Initials.Label.Style.Indent = 2
LastName.Label.Style.Indent = 2
' Width for LastName/Initials input boxes
LastName.Style.Width = "13.5em"
Initials.Style.Width = "5em"
' Drop-down selection list for Title
Title.Style.Control.Type = ControlTypes.ctDropList
FullName.Ask()
The comments in the code explain what each set of statements does. However, there are some additional points to note.
▪Statements are grouped by function rather than by question name, so all the statements to do with placing response controls next to question texts are together. You could reorganize the statements so that the statements are grouped by question name, if you find this approach more logical. As long as all requirements are covered it does not matter what order they are defined in. The only rule is that the .Ask statement that displays the question comes last.
▪The widths of the input boxes for LastName and Initials have been specified to ensure that the ends of the boxes line up. Working out the measurements is done by trial and error as you test your script.
▪The maximum response lengths for FirstName, LastName, and Initials were set in the metadata at 40, 40, and 5 respectively to ensure that the input boxes were displayed as single-line boxes. Lengths greater than 40 characters result in input boxes showing six lines of 34 characters.
The metadata equivalent of this routing code is as follows:
Title1 "Title"
labelstyle(width="5em")
style(elementalign="right", control(type="droplist"))
categorical [1..1]
{Ms, Miss, Mrs, Mr};
FirstName1 "First Name"
labelstyle(width="5em")
style(elementalign="right")
text [0..40];
Initials1 "Middle Initials"
labelstyle(elementalign="right", indent=2, width="6em")
style(elementalign="right", width="5em")
text [0..40];
LastName1 "Last Name"
labelstyle(elementalign="right", indent=2, width="5em")
style(elementalign="right", width="13.5em")
text [0..40];
FullName1 "" page(Title1, LastName1, FirstName1, Initials1);
The question sub-template for this example is:
<mrSubTemplate>
<mrData QuestionElement="Label"/>
<mrData QuestionElement="Controls"/>
</mrSubTemplate>
Dealing with dates
Forms often require users to enter or select dates or partial dates. Typical examples are dates of birth or start and end dates for credit cards or club membership. Depending on how you want to use the data, you can either display a simple input box and let respondents enter a value of their choice, or you can present the question with separate boxes for each date part. The easiest way to display separate boxes for each date part is to create a separate question with a drop-down response list for each date part you want, and to display the questions and response controls side by side in a single line. Here’s an example that prompts for the user’s date of birth:
Date of birth a 3 side-by-side drop-down lists
It was created using the following routing code:
' Template for question text & response controls on same line.
IOM.Questions[..].QuestionTemplate = "styles2.htm"
' Response box on same line as question text
Dayname.Style.ElementAlign = ElementAlignments.eaRight
Monthname.Style.ElementAlign = ElementAlignments.eaRight
Yearnumber.Style.ElementAlign = ElementAlignments.eaRight
' Question text on same line as previous response box
Monthname.Label.Style.ElementAlign = ElementAlignments.eaRight
Yearnumber.Label.Style.ElementAlign = ElementAlignments.eaRight
' Drop-down response lists
DayName.Style.Control.Type = ControlTypes.ctDropList
MonthName.Style.Control.Type = ControlTypes.ctDropList
YearNumber.Style.Control.Type = ControlTypes.ctDropList
Dob.ask()
The questions were defined as basic categorical questions, with MonthName and YearNumber having null question texts since these were not required in the form.
Here’s the same specification defined entirely in the metadata section:
DayName1 "Date of Birth" labelstyle(elementalign="right")
style(elementalign="right", control(type="droplist"))
categorical[1..1]
{
d1 "01",
d2 "02",
d3 "03"
};
MonthName1 "" labelstyle(elementalign="right")
style(elementalign="right", control(type="droplist"))
categorical[1..1]
{
January, February, March, April, May, June, July,
August,September, October, November, December
};
YearNumber1 "" labelstyle(elementalign="right")
style(elementalign="right", control(type="droplist"))
categorical[1..1]
{
y1956 "1956",
y1957 "1957",
y1958 "1958"
};
Dob1 "" page (DayName1, MonthName1, YearNumber1);
This example uses the question sub-template shown earlier in this topic.
Using tables to simplify alignment specifications
Some forms are very precisely laid out so that the overall effect of the form is grid-like; that is to say, the question texts and response controls in each row line up with the corresponding elements in the other rows. If this is the layout you want for your form, you may find that a template that lays out the elements as a table goes a long way to simplifying your alignment specifications.
Example
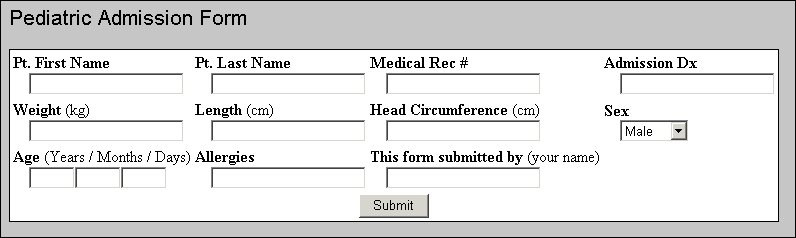
The DDL comes with an example project that illustrates this perfectly. It is in the [INSTALL_FOLDER]\IBM\SPSS\DataCollection\7\DDL\\Scripts\Interview\Projects\Forms folder. The questionnaire file contains two examples, and it is the second one that uses a tabular layout. The form looks like this:
As you can see, the question texts appear above the response boxes and all the boxes are lined up under one another. The template for the form (TableForm.htm) defines a table of three rows of four columns each. Questions 1 to 4 go in the first row, questions 5 to 8 go in the second row, and questions 9 to 12 go in the third row.
Unlike the question sub-template used in the previous examples, this template does not specify the locations of the question texts and response controls, so you would expect each table cell to contain one question displayed using the default layout; that is, a question text and a response control on separate lines with a blank line in between. However, in the illustration, there are no blank lines between question texts and response boxes. This is because each question contains the specification style(ElementAlign="NewLine") which instructs the interviewing program to insert a line break between the question text and the response control. The indentation of the response boxes is the standard indentation used to separate the response box from the question text, and is not specified in the script.
See also