Row, column, and cell characteristics
You can define the following settings for the rows, columns, or individual cells of the grid:
Row height
The interviewing program normally makes each row as tall as it needs to be to hold the row text. You can set your own row heights by placing the following tag inside any of the cell-formatting sections:
<height>value</height>
where
▪value is the row height in pixels.
Column widths
The interviewing program normally makes each column as wide as the contents of the widest cell in that column (usually the column heading) and separates each column with one pixel of space. You can specify your own column widths in various ways depending on whether all the columns are the same width.
If all columns are the same width, place the following tags in the <allCells> section of the grid template:
<width>
<widthFormat>type</widthFormat>
<value>number</value>
</width>
where
▪type defines how to interpret the value parameter, and is either absolute if value is the width of the column in pixels, or percent if value is the column width as a percentage of the total grid width.
▪number is the width of the column in the given format.
You can override this specification for the column of row headings, for example, by placing these statements inside the <headCol> definition as shown below:
<headCol>
<headerCell>
<width>
<widthFormat>percent</widthFormat>
<value>15</value>
</width>
</headerCell>
</headCol>
Note When column widths are specified in different sections of the template, the interviewing program chooses the width for a particular column based on a fixed order of precedence among the sections. For more information, see
Precedence between specifications at different levels.
If you want to vary the column widths across the grid, place the following statements in the top level of the grid specification:
<colWidths>
<width>
<widthFormat>type</widthFormat>
<value>number</value>
</width>
</colWidths>
Repeat the <width> block for each column in the grid.
Note <colWidths> overrides any column widths specified elsewhere in the template.
Here is an example that uses <colWidths> to set specific widths for each cell in the table. The column width specification is:
<colWidths>
<width>
<widthFormat>absolute</widthFormat>
<value>100</value>
</width>
<width>
<widthFormat>absolute</widthFormat>
<value>40</value>
</width>
<width>
<widthFormat>absolute</widthFormat>
<value>60</value>
</width>
<width>
<widthFormat>absolute</widthFormat>
<value>80</value>
</width>
<width>
<widthFormat>absolute</widthFormat>
<value>100</value>
</width>
<width>
<widthFormat>absolute</widthFormat>
<value>120</value>
</width>
<width>
<widthFormat>absolute</widthFormat>
<value>140</value>
</width>
<width>
<widthFormat>absolute</widthFormat>
<value>40</value>
</width>
<width>
<widthFormat>absolute</widthFormat>
<value>50</value>
</width>
</widthFormat>
This produces the following table:
Row and column headings
Specifications for row and column headings are enclosed in the following tags:
<headRow>...</headRow>
<headCol>...</headCol>
Specifications for row and column headings have two parts: cell formatting and row or column repetition. Cell formatting describes the characteristics of the row or column headings and covers such things as the cell color, the text style, and the column width. Row or column repetition specifies how frequently the heading row or column should be repeated in the grid.
Cell formatting
To define cell requirements, place the appropriate statements inside the following tag:
<headerCell>...</headerCell>
For example:
<headCol>
<headerCell>
<font>
<fontStyle>italic</fontStyle>
<fontFace>Tahoma</fontFace>
</font>
<align>right</align>
<valign>center</valign>
</headerCell>
</headCol>
Repeating the row or column headings
With large grids, the respondent may need to scroll to see the full grid. When this is likely, you can make the grid easier to follow by repeating the heading row or column so that the row or column headings are still visible after scrolling. To do this, place the following tag inside the headCol or headRow section:
<repeat>number</repeat>
where number is the number of rows or columns after which the heading row or column is to be repeated. 0 displays the heading row at the top and bottom of the grid, or the heading column on the left and right of the grid.
For example:
<headCol>
<headerCell>
<font>
<fontStyle>italic</fontStyle>
</font>
<align>right</align>
<valign>center</valign>
</headerCell>
<repeat>0</repeat>
</headCol>
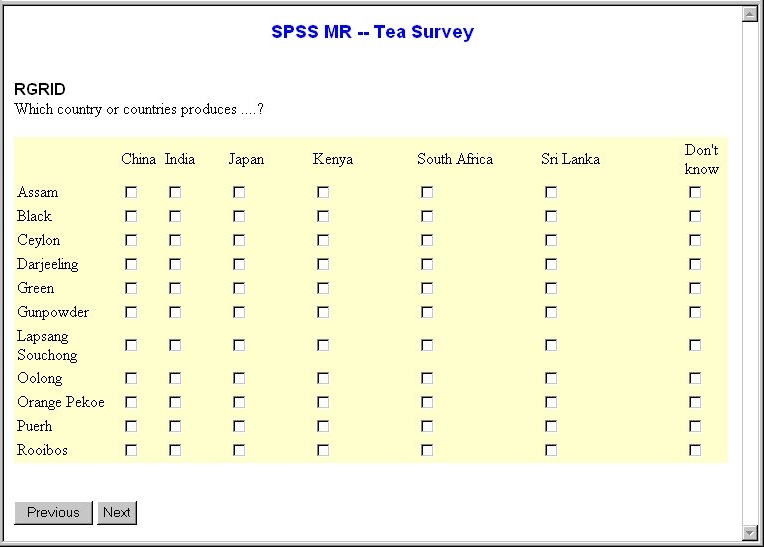
displays the heading column on the left and right of the grid as follows:
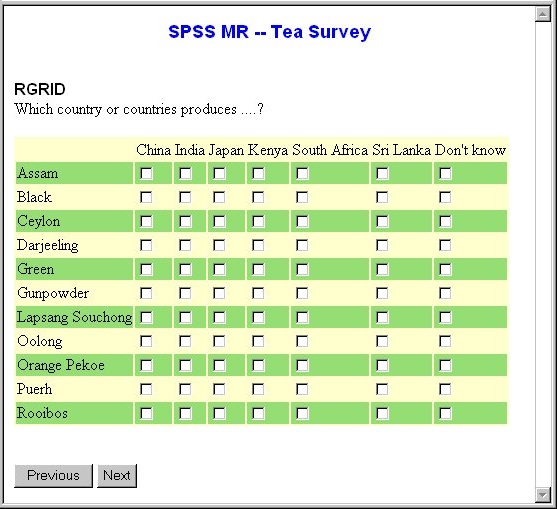
The following specification creates a grid with mauve cells for the row and column headers. The texts in the heading row (that is, the column headings) are bold and are centered within the column widths; the texts in the heading column (that is, the row headings) are italic:
<headRow>
<align>center</align>
<bgColor>
<colorFormat>numeric</colorFormat>
<color>#C0D9D9</color>
</bgColor>
<fontStyle>bold</fontStyle>
</headRow>
<headCol>
<bgColor>
<colorFormat>numeric</colorFormat>
<color>#C0D9D9</color>
</bgColor>
<fontStyle>italic</fontStyle>
</headCol>
Different formats for alternate rows or columns
Large grids can be made easier to read if you use different formatting on alternate rows or columns of the grid. You specify the changes for alternate rows and columns of the grid by placing the necessary tags within the following markers:
<altBodyRow> ... </altBodyRow>
<altBodyCol> ... </altBodyCol>
When the interviewing program builds the grid, it uses the characteristics you have defined for the grid as a whole, and then reads the alternate specifications and updates just those aspects of the grid before displaying it. For example, if the template contains the statements:
<allCells>
<bgColor>
<colorFormat>numeric</colorFormat>
<color>#FFFFCC</color>
</bgColor>
</allCells>
<altBodyRow>
<bgColor>
<colorFormat>numeric</colorFormat>
<color>#CD7F32</color>
</bgColor>
</altBodyRow>
the rows of the grid will be alternately pale yellow and bright green, as shown below:
Note If the template contains only <altBodyRow> or only <altBodyCol>, the settings in that section are applied to both rowgrids and colgrids. If the template contains both specifications, the interviewing program uses the settings in the specification that matches the grid’s type and ignores settings in the other alternate specification. Therefore, a row grid is formatted using the <altBodyRow> specification and the <altBodyCol> specification is ignored.
Precedence between specifications at different levels
When a grid template contains specifications at more than one level, the interviewing program uses the following rules to determine which specifications take precedence over others:
▪In the top left cell of the grid, colWidths takes overall precedence, followed by headCol, headRow, allCells and textColor in that order.
▪For all other cells in the left-hand column, colWidths takes overall precedence, followed by headCol, altBodyRow (for odd-numbered rows only), allCells and textColor in that order.
▪For all other cells in the top row, colWidths takes overall precedence, followed by headRow, altBodyCol (for odd-numbered columns only), allCells and textColor in that order.
▪For all other cells (the body of the grid), colWidths takes overall precedence, followed by altBodyRow (odd-numbered rows in a row grid or where altBodyCol is not defined), altBodyCol (odd-numbered columns in a column grid or where altBodyRow is not defined), allCells and textColor in that order.
Here is an example that uses color to illustrate these rules. The grid template is:
<allCells>
<bgColor>
<colorFormat>numeric</colorFormat>
<color>#FFFFCC</color>
</bgColor>
</allCells>
<headRow>
<headerCell>
<bgColor>
<colorFormat>numeric</colorFormat>
<color>#C0D9D9</color>
</bgColor>
</headerCell>
</headRow>
<headCol>
<headerCell>
<bgColor>
<colorFormat>numeric</colorFormat>
<color>#93DB70</color>
</bgColor>
</headerCell>
</headCol>
<altBodyRow>
<bgColor>
<colorFormat>numeric</colorFormat>
<color>#FF6EC7</color>
</bgColor>
</altBodyRow>
<altBodyCol>
<bgColor>
<colorFormat>numeric</colorFormat>
<color>#70DBDB</color>
</bgColor>
</altBodyCol>
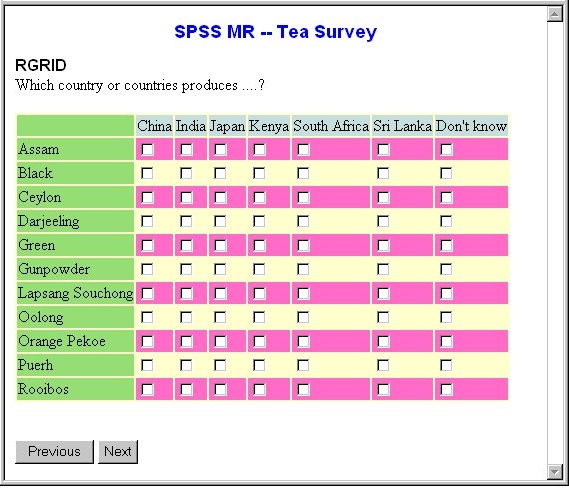
With this template, row grids look like this:
If you follow the rules, you will see that the cells are assigned colors as follows:
▪The top left cell takes its green color from headCol.
▪The remaining cells in the left-hand column take their color from headCol too.
▪The pale blue cells in the top row come from headRow.
▪The pink and pale yellow cells form the body of the table and are controlled by altBodyRow and altBodyCol, but because this is a row grid only altBodyRow applies. Odd-numbered body rows take their pink color from altBodyRow, while the even-numbered rows take their pale yellow from allCells.
Column grids are formatted as follows:
The cell colors are assigned as follows:
▪The top left cell takes its green color from headCol.
▪The remaining cells in the left-hand column take their color from headCol too.
▪The pale blue cells in the top row come from headRow.
▪The turquoise and pale yellow cells form the body of the table and are controlled by altBodyRow and altBodyCol, but because this is a column grid only altBodyCol applies. Odd-numbered body columns take their turquoise color from altBodyCol, while the even-numbered columns take their pale yellow from allCells.
See also