Adding text rows to tables
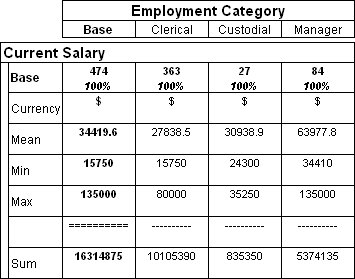
Sometimes you may want to display text or symbols in the cells of a table. For example, the following table (based on the Employee Data sample, available with the UNICOM Intelligence Developer Documentation Library) has an additional Currency row that displays the currency type, and a row that acts as a dividing line before the final row:
Table of current salaries with currency and divider rows
You can create text-only rows by adding a Column text item to a variable, and specifying the text to appear in the cells when the variable appears in the rows of a table.
You can add the same text to each column of the new row, or you can enter different text in each column. In the above table, the first column of the row used as a divider contains different characters.
The text appears only when the variable is on the side of a table. If you add the variable to the top of the table, only the heading text appears. Text-only rows are not displayed in charts.
Note If you want to append text to the contents of an existing cell, for example, to add a currency symbol, you can add a prefix or suffix to the cell contents in the Table Properties dialog box. See
Adding and removing cell contents for more information.
To add text rows to a table
These instructions explain how to add text rows to a variable on a single table, rather than for all tables. This is because the text in the row may be specific to the categories in the variable on the top of the table and therefore inapplicable when tabulated with other variables.
1 Create the table by adding the variables to the top and side of the table.
2 In the Design pane, select the variable on the side of the table.
3 From the menu, choose Variables > Edit Table Variable.
This opens the Edit Table Variable window and displays information about the variable.
4 From the menu, choose Categories > Insert Categories.
This opens the Insert Categories dialog box.
5 In the list of Available Items, select Column Text, and click the >> button to add it to the list of items to insert.
6 In the Description field, enter the heading for the row, or remove the text to leave the heading cell blank.
7 Click OK to close the Insert Categories dialog box.
8 In the Edit Table Variable dialog box, select the new category and use the up

and down

buttons to move it to the position where you want it to appear.
9 If it is not already visible, choose View > View Properties from the menu to display the Properties pane.
10 In the Column Text field in the Properties pane, type the text that you want to appear in each column for the new row.
If you want the same text to appear in each column, just type the text; for example:
$
If you want different text to appear in each column, type the text to appear in each column, separated by a semi-colon; for example:
==========;----------;----------;----------
If there are more columns than text, the text will repeat from the beginning in the remaining columns. This means that if you want to repeat text for a set of columns, say in a nested table, you can type the text for the first set of columns and it will repeat for the remaining columns. For example:
=====;-----
displays as:
===== ----- ===== ----- ===== -----
if there are six columns.
If there are more text strings than columns, the additional strings are ignored.
11 Choose Save and Close to save your changes and return to the Design pane.
12 Click the Results pane to regenerate the table and display the results.
See also