Activation process
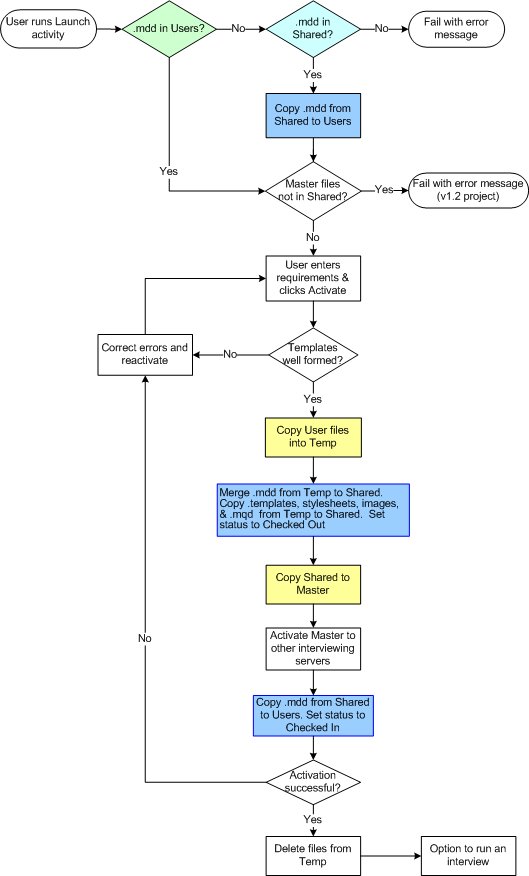
When you have entered all the necessary information on the four tabs you can activate the project. The flowchart illustrates the activation process, which is described in more detail below the flowchart.
Activation flowchart
When you start Launch, the key points of the activation process are as follows:
1 If the Users folder does not contain a .mdd file, Launch is unable to start. If the file is not present in the Users folder but is present in the Shared folder, then it is copied into the Users folder and activation can begin.
2 Launch then checks whether there are files for this project in FMRoot\Master that are not present in FMRoot\Shared. If this is the case, activation fails since it is possible that the project may be a version 1.2 project that has not been upgraded to work with later versions.
3 Once the file checks have been carried out you can enter your activation requirements. Click Activate when you are ready to activate the project.
4 Launch checks the project’s template (.htm) files to ensure they contain well formed HTML. If files are not well formed, Launch displays a message box listing the names of the files that are incorrect. Each filename is followed by a warning icon (! in a triangle) which you can hover over to see a description of the error. To save the contents of the message box to a file, click Copy to Clipboard. Click Proceed to continue activating or Cancel to stop.
5 Launch copies the project’s .htm, .xml, .mdd, and .mqd files, as well as any image files, into a subfolder within your UserName\Temp folder. This is a safety precaution that ensures that any changes made by other users to the User files during activation cannot affect the activation process.
6 Launch copies the files from UserName\Temp folder into FMRoot\Shared. If an .mdd file already exists in the shared project folder, Launch merges the newer version of the file into the existing file and displays a progress box while this happens. If the merge fails an error message is displayed.
7 Launch adds the datasource connection string for the project’s case data to the .mdd file.
8 Launch copies the project’s folder from FMRoot\Shared into FMRoot\Master. If an .mdd file already exists in the shared project folder, Launch merges the newer version of the file into the existing file.
9 Launch contacts each interviewing server and tells it to update its project files. Each interviewing server responds by copying the new or updated files from the Master folder into the local project folder in Projects.
10 If all these steps run successfully, the files are deleted from the Temp folder.
To activate a project
Note Space characters should be avoided in the project names in order to avoid potential activation issues.
1 Click Launch.
When activation is complete, a message box lists two URLs for running interviews. The first one is for live interviews; you can copy this URL to the clipboard for pasting into a Web page. The second one is for designers wanting to test their questionnaires; data for these interviews is flagged as test data in the case data database so that it can be ignored in analyses and exports of the final survey data.
2 If activation is successful and you want to run a test interview, click Copy to Clipboard next to the URL for designers who want to test their questionnaires. You can then pate this URL into a new browser window to test the questionnaire.
3 Click Close Window.
Notes
The .NET Framework’s default encoding reads the registry’s ANSI codepage when encoding. As a result you may encounter errors when activating questionnaires that include characters such as umlauts (for example, when the project name contains the character Ä). You can resolve this issue by updating the server’s ANSI codepage:
1 Access the registry on the server (Start > Run > regedit).
2 Navigate to:
HKEY_LOCAL_MACHINE\SYSTEM\CurrentControlSet\Control\Nls\
CodePage\ACP
3 For servers running a German operating system, enter a value of 850; for Chinese, enter a value of 936; for Japanese, enter a value of 932.
4 For more information, see Encoding Class on the Microsoft MSDN site.
See also

