Autocoding a text variable
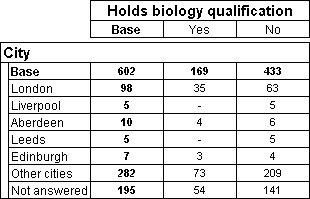
Although coding open-ended responses generally requires some intelligent human intervention, it is sometimes possible to autocode the text stored in a text variable. For example, when a text variable stores addresses, you could code the addresses by searching for city or postal district names. However, there are some risks in this approach because, for example, a city name might be included in a street name. Here is an example of a table that includes the address variable after it has been autocoded based on city names.
Table showing address by biology; addresses autocoded into cities
These instructions describe how to set up the autocoding for the variable so that the new categories appear in all tables that use the variable. If you want to set up the autocoding in a specific table, use the
Edit Axis dialog.
To autocode a text variable
1 In the main UNICOM Intelligence Reporter - Survey Tabulation window, select the Define tab.
2 In the Variable List, select the text variable, and then click Variables > Edit.
The Edit Variable dialog opens: see
Edit Variable dialog.
3 From the menu at the top of the Edit tab, choose Insert.
The Insert Item dialog opens: see
Insert Item dialog .
4 In the list of Available Items, select User Defined Category, and then click Add.
Repeat this step until you have added the required number of categories.
5 Click OK.
This inserts the new categories into the list of items on the Edit tab.
6 For each of the new categories do the following:
On the line that represents the category, click
Edit item. The Edit Category dialog opens: see
Edit Category dialog.
In the Variable List, select the text variable.
Define the expression for this category. For example, select Contains from the list and then enter London.
When you have finished defining the expression, click OK to close the Edit Category dialog.
In the Edit tab, enter a label for the new category in the Label column.
7 When you have finished defining expressions for all the categories, click OK to close the Edit Variable dialog.
The changes are applied to any existing tables that include the variable next time you populate them, provided you have not used the Edit Axis dialog (see
Edit Axis dialog) to specify how the variable is to appear in any of those tables.
See also

