Grid and loop slices
Sometimes you may want to tabulate the results of one iteration of a grid or loop against another variable. Using an iteration of a grid or loop is sometimes called a grid or loop slice. Although you cannot create grid tables when you are using the flat view of the data, you can tabulate grid and loop slices. The examples in this topic use the Household sample, which uses the hierarchical view and cannot be represented in a flat form. However, the main principles of working with grid and loop slices are the same in both the hierarchical and the flat view and this topic explains the differences.
Continuing with the vehicle rating example grid used in
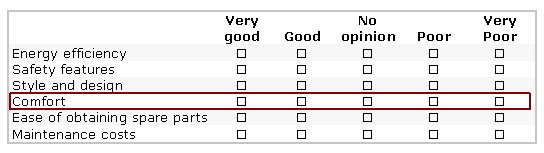
Understanding grid tables, suppose you want to tabulate the rating that respondents gave to the vehicle's comfort by another variable (such as the vehicle type). Here is the grid question with the comfort slice highlighted:
Rating grid question
To create a crosstabulation of this grid slice by the vehicletype variable:
1 Start a new table.
2 In the Variable List, expand the vehicle loop.
3 Select the vehicletype variable that is nested within the loop and click Click to add on the side axis.
4 In the Variable List, expand the rating grid that is inside the vehicle loop, and then expand the Column variable that is inside the rating grid.
5 Select the Comfort slice and click Click to add on the top axis.
6 Click the
Populate button

to populate the table.
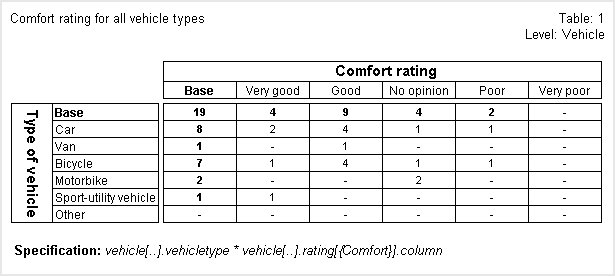
Here is the table:
Table showing type of vehicle by comfort rating
You can use a slice of a numeric loop in a similar way, provided the loop is defined as expanded. In a numeric loop, the iteration ID is a numeric value, rather than a category name. For example, suppose you want to tabulate the gender of the first person in each household by the region. You would do this as follows:
1 Start a new table.
2 In the Variable List, select the region variable and click Click to add on the top axis.
3 In the Variable List, expand the person loop, and then expand the gender variable that is inside the person loop.
4 Select the first slice (1) and click Click to add on the side axis.
5 Click the
Populate button
to populate the table.
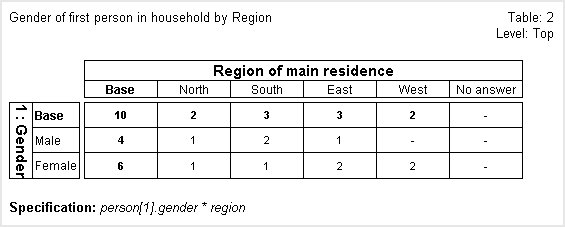
Here is the table:
Table showing gender by region of main residence
Notice that in this table, the label in the side axis is "1: Gender". When you use a slice of a grid or loop in a table, the full label is used instead of the normal label. This makes it clear which slice is being used, because, by default, the full label is the label prefixed by the iteration name.
However, it is possible to customize the full label by defining text substitutions in the variable’s label. For example, in the first table above, the label in the top axis is "Comfort rating". This was achieved by changing the label of the
Column variable (which is inside the
rating grid) in the Edit Variable dialog box (see
Edit Variable dialog box to take advantage of the full label feature. The label was changed to "\+loop2\- rating". This uses the
\+loop2\- insertion text, which inserts the label of the current iteration into the full label. However, note that you cannot change the label of a variable that is inside a grid or loop when you are working in the flat view. For more information about working with full labels, see the UNICOM Intelligence Developer Documentation Library.
Restrictions
The restrictions on using a grid and loop slice are:
▪To tabulate the slice, the parent grid or loop must be defined as expanded.
▪You cannot edit a slice of a grid or loop in the Edit Variable dialog box. However, if you are using the hierarchical view, you can edit the parent variable.
Setting the population level explains that when working in the hierarchical view the default population level for a table is generally the lowest common ancestor level of all the filters and variables that are included in the table (including variables used in cell contents). However, when a table contains a grid slice at a lower level than any other variable included in the table, the default level will be the level
above the grid slice. This is because, when tabulating a grid slice, it is more common to want to show the number of cases at the next level up rather than the number of responses at the grid level. However, you can choose to populate the table at the level of the grid slice if necessary.
See also
See also