Tutorial – using the System Architect Report Editor
This part of the Reporting System tutorial presents a series of screens labeled in order of the recommended sequence for completing the Add Report dialog. Links are provided to more information about each of the dialogs used to add a report.
Note In the ‘Tutorials’ part of the online help, Report generation and publishing covers running a prewritten report, creating your own report using the GUI Report Editor, and publishing a report in HTML.
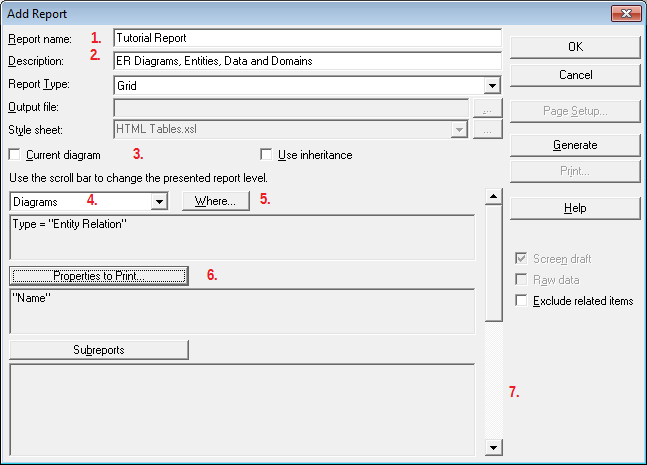
Complete the following steps, which are highlighted in red in the following diagram. For more information, see Editing and adding a report.
1 Enter the name Tutorial Report in the Report Name field. The report name will appear at the top of the printed report page. The name will display in the report list at the center of the Reports dialog.
2 Enter a brief description of the report, ER Diagrams, Entities, Data, and Domains.
Note The description appears in the status line at the bottom of the Reports dialog when the report is selected.
3 This report queries the entire encyclopedia and does not use inheritance; therefore, do not put a check in either the Current Diagram or Use Inheritance check box.
4 Select Diagrams as the starting Class specification (see Class specification).
5 Click the Where button to open the Select <class> Where dialog.
a Select Entity Relation as the Type.
b Click OK to close the dialog.
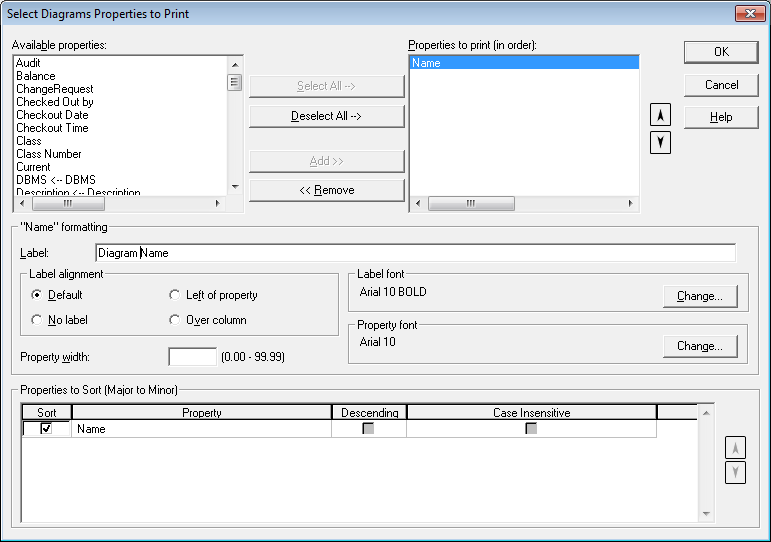
6 Click the Properties to Print button to open the Select <class> Properties to Print dialog. An example of this dialog is shown below; for more information, see Select <class> Properties to Print dialog.
b Label the column Diagram Name and specify names for the labels to be printed to the left of each entry in the column using the procedure for specifying property layout (see Editing and adding the report body layout).
c Click OK in the Select <class> Properties to Print dialog to return to the Add Report dialog.
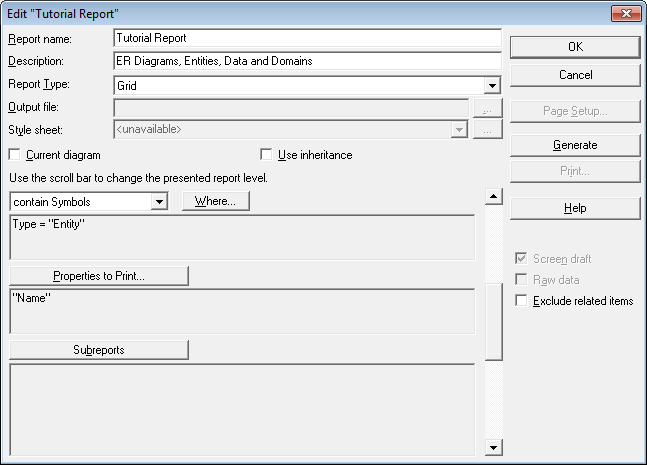
7 Use the scroll bar to make the next level of the report visible.
8 In the Add Report dialog, repeat the following steps for the second level of the report.
▪Steps 5 and 6 may be omitted for this level because an entity symbol is always defined by an entity definition having the same name; it is not necessary to specify a type or to print anything at this level of the report.
11 Use the scroll bar to make the next level of the report visible.
12 Repeat the following steps for the fourth level of the report.